How to Build DIY Planters
There’s no doubt that traditional gardens look amazing, but for those of us who have a small backyard, busy schedules, and a whole life around work, a conventional garden may be hard to maintain. The quick solution is learning how to create amazing planters yourself.
The trick is all in your selections, so instead of running down to the store and grabbing the first planter box you find, check out these few simple tricks and tips on how to create your own planter box from scratch:
What You Need To Know First Before Making Your Planter Box
Growing Conditions
First off, you must first consider the growing conditions. For example, if you fill a window box with shade-loving plants but put them in a sunny area, then chances are those plants will end up struggling to survive.
The same goes for sun-loving plants – if you choose to place them in an area with no sun, they will also fight to survive. Always think about where you will be placing your pot and if the selected plants will like living in that location. When you buy plants, it will usually indicate its optimal growing conditions. Aside from the location requirements, you also need to take note of the moisture and soil preference. If you cannot find it on the label, you can always ask the person selling the plants. They can fill you in on all the information you need.
Don’t Be Afraid To Experiment With Loud Colors
A well planned out container can be visually stimulating to look at. Don’t be scared to experiment with loud and bold colors. You can generate excitement and lots of energy by combining neutral colors with bright complementary colors like purple, yellow, or orange. If you want something a bit more soothing on the eyes, you can try blue, pink, or red colors. Take note that, when you select your flowers, you may want to consider the color of your house, patio, and deck so you can match it where it seems appropriate.

Don’t Be Afraid To Contrast Textures
Apart from creating color balance, foliage is just as important when it comes to container planting. When choosing your plants, remember to consider the size of the leaves and the texture of the surface. It is an often overlooked feature, but if you choose wisely, it can help your plants stand out.
Plan Your Plant Structure
before you plant anything, you will also need to plan the structure of your container. If you are selecting more than six plants, you need to think about the height, the growth habits of the plants, and the shape. Most plants grow upright, trail downwards, or are quite broad for certain plant containers. The best plant containers contain at least one of these plant types.
How To Build Your Own Planter Box

Now that you have everything in place, its time to start building your planter box:
Step 1: Sizing The Wood
Before anything else, you must decide what size you want your box to be. The decision you make should be based on how many plants you want to include in your box, as well as the area. The most typical size for this sort of planter is roughly four feet by two feet.
Step 2: Buy The Wood
Cedar or untreated wood will work great when it comes to building planter boxes. This type of wood is both easy to work with and can hold up against unpredictable weather that your plants may get exposed to. For a box that is four by two feet, you can buy a 12 foot board, which can be cut down to form the sides of the box. The width of your box should be at least ten inches. You will also need a piece of wood that will act as the base of your planter. If you are placing the box over the soil, you can put a layer of flattened cardboard at the bottom as your barrier against weeds.
Take note that pressure-treated wood contains harmful chemicals that can kill your plants while inside the box. This can also harm your vegetables if you will be growing any. It’s safer to use ACQ treated wood as an alternative because it does not contain any harmful chemicals.
Step 3: Cut The Wood According To Measurements
With a measuring tape, measure out each side of the wood that you will be using to create your planter box. Mark the places with a pencil and make your cut. If you do not want to be bothered by cutting it yourself manually using a saw, you may use an electric saw that will make sure that all the cuts are as straight as possible.
If you do not have any electrical tools, you can ask the workers where you purchased your wood from to cut it for you down to its appropriate size. You may need to pay a small fee for this, but some lumber or hardware stores will gladly do the cutting for free.
Step 4: Attach The Boards
Drill holes into two of your wood boards. Pilot holes are drilled into the wood to make sure that the wood doesn’t splinter when you start inserting the screws. You will only need to do this process with two of your wood boards, preferably the shorter ones. On the edge off the board, make three 3/4 inch holes. The hole placed in the middle should be centered with the width of the wooden board.
Fasten your boards with galvanized screws. These are better if you will be placing your planter box outdoors, as the galvanized metal can withstand the elements and prevent rusting when placed outside. Line up the boards so that they align with the pilot holes. Use a drill to ensure that all the screws go into the right holes. However, if you don’t have a drill, you can also use a screwdriver for this step.
Make sure that you drill drainage holes as well at the bottom of your box. Turn over your box and use your drill to create five holes at the bottom. These holes play a crucial part in your planter box design because it will allow your plant’s room to breathe. Not drilling any drainage holes will cause your plants to get “soggy feet.”
If you have a larger box, you should consider creating more holes; however, if your planter will be placed over soil, these holes will not be needed.
Step 5: Add The Finishing Touches
Inside your planter box, place a layer of a vinyl or nylon screen. This will protect the wood of your planter. Cut the screen so that it fits well into your box and place it at the bottom. Fix it down using some nails and make sure to drill holes as well in the screens that line up with drainage holes at the bottom of your box.
Using a sander, smooth out all the rough edges of your box. This will give your planter a subtle finish. If you want it to look smooth, you can sand it down entirely, but this isn’t necessary. With that said, it is always a good idea to sand it down to get rid of any splinters.
You may paint, prime, or stain the outside of your box according to your liking. It’s better to pick a color that matches the color of your house or the location you will be placing your planter in. You can also choose to leave it as is because cedar naturally looks good. Make sure that you do not paint the inside of your planter, as this may contaminate the soil and kill your plants. Instead, use a plastic liner to protect the wood.
Add a thin layer of gravel into your planter box, as well as a little bit of potting soil and compost. The gravel will help drain the planter, while the type of soil or compost you put in it will also depend on the kind of plants you plan to put inside your box.
Best Examples Of Planter Boxes

Planter Box with Small Plastic Inserts
One of the simplest planter boxes you can make is a constructed two by four narrow planter box with three plastic tubs in the middle. These tubs can be drilled into your box to help the drainage and help keep your plants separate. This prevents the wood from rotting. It’s straightforward to make and can be done by just about anyone – just remember to drill the holes at the bottom when making it.
L Shape Box
If you are looking to place a planter box in the corner of your patio or inside your house, then this will be your best choice. An L shape can fit very well against a corner or beside a taller plant. It can also fit nicely in your garden.
Sloping Slide Box
Part of the fun in planting means you get to be as creative as you can be with your planter box. These sloping slide boxes can add a creative edge to your backyard.
Bench Planter Box
The bench planter box is two-towered and gives the outside of your house a little bit of life. It can also serve as a comfy outdoor seat for your guests.
Concrete Wall Planter Boxes
If your house is already industrially designed, then you will want a backyard with the same look and feel. These concrete planter boxes will be your best bet. Whether you opt to go for a more traditional looking box on the ground or you want to place them hanging in your back yard, this will surely complement the style of your house.
Lighted Bamboo Box
Adding drama to your backyard can now be possible with this planter box. If you are looking to add a design that is casual during the day but very eye-catching and dramatic at night, the lighted bamboo box can pull off any setting. All you need to do is add lights along the inside rim of your planter. If you have any dried branches lying around or some bamboo, you can stick it inside your box, and it will go well with the lights.
Layered Stone Façade
If your house is made out of brick, then this will compliment your style. Building a stone or stone façade box can add an instant appeal to any kind of home. It’s also an inexpensive and easy way to spruce up the outside area of your house.
Sofa Planter Box
For a house with a two-tiered deck, this design will surely be unique. If you have a sunken sofa, you can rim the edges with soft pink flower boxes. This provides an elegant and classy feel to your deck. So if you have some friends and family over, you will easily be able to catch their attention with this design.
Galvanized Tub Box
Container gardening has been a pastime for many gardening enthusiasts because container tubs can be used for almost anything. Galvanized tubs make fantastic planter boxes as well because they fit any style of house and is also safe for your plants.
Covered Hinged Greenhouse Box
Did you know that you can create your own greenhouse from scratch? This impressive example is covered with a garden quilt material, which helps maintain the temperature. This is especially useful if you are planting vegetables and herbs in your garden.
Blue Planter Box
Looking for something to fill up that last space in your home? This planter box is comprised of old lattice and will go well in any corner. It’s positioned together in a cross pattern to create that three-dimensional look. The borders are also made out of two by two boards, and the box itself is placed a little higher than the ground to give more room for drainage. Of course, you do not have to limit this box to just one color. Depending on the design of your home, you can paint it according to how it would fit the style. You can be as creative as you want with it.
Modern Chic Planter Box
This type of planter box is best for those who have a modern design. It will be best placed on a windowpane of a small patio. The box is made out of cedar, and it’s slightly raised to give more room for drainage. You can also be as creative as you want with this box – you can paint it any color you want to match the look and feel of your home. Adding stones on top of the soil will allow for more natural drainage.

Two-Level Wooden Planter Box
If you have a small porch or patio, this box will fit your style because it is two-tiered. To create this box, you will need treated lumber that does not use chemicals and to then begin building a frame. The sides of the planter must be two by four. You can use any angle for this frame as long as it fits.
Cedar Box with Iron Edges
If you are the type that likes style and elegance in your home, then this planter box is for you. The knots on the cedar wood compliment the iron edges of the planter box, which will look good on any porch or patio. The planter is also raised a bit and spaced so that the soil can be quickly drained.
Straw-Bale Box
If you want to go a different way with your gardening, then you should try the straw bale planter box. Take note, however, that the bale will need 10 to 14 days to condition, but after that, you’ll be able to plant it properly into your box.
Deck Railing Box
For those of us who like to lounge around in the backyard. Why not consider adding something special to your sanctuary? The deck railing planter box will surely add a unique twist to your yard. With just a few simple materials and maybe an hour and a half of work put into creating it, you’ll be able to add this planter box to your outdoor living space. The best part about it is, you get to be as creative as you want with it. You can color and design it any way you like as long as it fits properly on your deck railing.
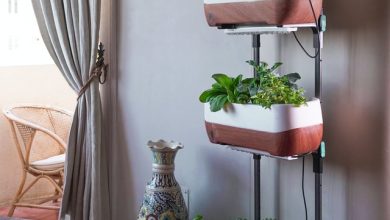
Self-Watering Planter Box
Self-watering sounds very promising, don’t you think? Though this planter box is every homeowner’s dream, it will take you two days to build but worth all the hard work. Here are some reasons why you should consider this:
- Saves you from having to water your plants yourself
- Eases all the pain in your back and knees from crawling on the ground too much
- Fewer weeds in your garden
- Waters your plants while you are out of the house
- Fresh vegetables and herbs
- Fits almost any style
- Protect your plants from harmful insects
- Saves you a lot of water.
- Less hassle and less time spent on doing all the watering yourself
- No need for everyday watering

Now you’ve got everything you need to know about creating your own planters and designing a place in your home that you will love to be in. Whether it is reading that latest murder-mystery book or just enjoying the space with friends, a beautiful planter can turn any space into something magical.
If you are the DIY type and love to be creative, then designing your planters could be a fun project for you. We hope that we’ve managed to give you everything you need to know about planter creation. Now it is time to head down the hardware store and get started creating your next project.