How to Grow Aloe Vera

The succulent family of plants has been having its day when it comes to popularity. In the last decade, people have taken a strong liking to these unique, water-filled plants that are easy to care for and brilliant to look at.
It comes as no surprise, then, that as a member of the succulent family, Aloe vera is also enjoying a lot of attention. Aloe vera is a part of the largest succulent groups, and there are more than 500 related species of aloes.
The evergreen perennial is particularly simple to care for, but also has some beneficial purposes that not everyone is aware of. Surprisingly, the Aloe vera plant has an annual market of about $13 billion dollars all over the world.
So what makes it so special? How do you care for an Aloe vera plant and enjoy its additional benefits? If you’re thinking about adding Aloe vera to your home, the following information will help you to care for and enjoy such an interesting houseplant.
Physical Attributes of Aloe
The Aloe vera plant is often stemless or short-stemmed. While it’s common for the plant to reach anywhere between 24-39 inches in height, aloe plants can grow much larger if they are given the space and proper climate.
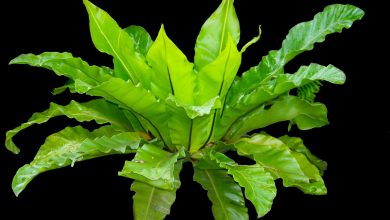
The leaves of a healthy aloe should be thick and plump, as a result of the way the plant holds water in its leaves. Coloring usually wavers between grey, grey-green, and bright green. In some cases, the leaves will showcase white spots on the upper and lower parts of the stems.
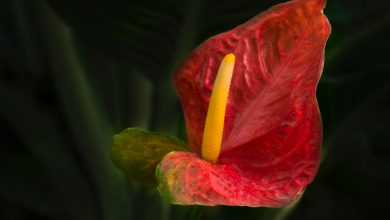
The sides of the leaves are adorned in tiny white teeth, with a serrated texture that is soft enough to touch. In some cases, Aloe vera will grow large enough that it will flower in the summertime, showing off orange, cone-shaped displays.
For Aloe vera houseplants, it’s not as common to see the plant flower in the summer, if at all.
Growing Aloe from Seed

Harvesting Aloe Seeds
Aloe vera plants do not produce seeds until they are at least four years of age. Even then, some plants will not produce anything for at least a decade. You’ll know that your aloe is able to produce seeds once it begins flowering.
Once your plant is done flowering, you can harvest seeds from it. However, it is important to know exactly how to harvest the seeds and what to do with them.
Once flowers are spent, you’ll notice that there are available seeds. The seeds of an aloe plant are grayish-brown or black, and they are flat. If you are seeing seeds that are light-colored, this is the sign that the seeds are not ready, and harvesting them will not lead to success.
Seeds will be located in dried pods. These pods need to be split in order to access the seeds, and they will appear brownish-green when they are mature enough. You can harvest these seeds immediately if your aloe is a houseplant.
Keep a bowl underneath the pods so that you don’t lose any seeds. Once you’ve gathered enough, you can place them in an envelope or brown paper bag and store them in a dark, cool place.
Keep in mind that if you know you are going to be harvesting, the seeds will have to be used within a year of their harvest. This will ensure that the seeds perform their best for you.
Planting Aloe Seeds
When you’re ready to utilize the seeds you’ve harvested – or purchased, it’s best to have a flat, more shallow holding space for your seeds. Any container will do, but something flat will help control weed growth and avoid over-watering.
Soil should be a good combination of peat and sand, which will ensure that the plant is in a well-draining medium. Seeds should sit at least an inch apart, and the soil should be moist. If you’re growing the seeds indoors, an additional heat source along the bottom of the container is ideal.
Use a heating pad, or place the tray on top of a warm appliance. The seeds will do best in an area that is warm and gets some sunlight throughout the day.
Mist the soil every day until you begin to see the presence of sprouts. These seedlings will need to establish strong roots, so keep them on the heat source for a couple of weeks.
It is time to pot when you can see at least three leaves sprouting from your seedlings. You can transfer them to their own small pots in a soil mixture that’s equal parts compost, pumice, and sand. As they continue to grow, you may treat them as you do your older aloe plants.

Caring for Aloe Vera
Aloe vera can be very easy to care for, so long as you provide it with the basic components it needs right off the bat. As soon as the aloe is unhappy with its location or treatment, you will begin to see signs of stress in the leaves.
Soil for Your Aloe Vera
Aloe vera is native to very warm regions, but they also thrive in a desert climate. That being said, their soil is usually dry and coarse, which is why they work to hold the water they need in their leaves and stem.
For your aloe houseplant, go for cactus soil that is standard for succulents and other desert plants. This soil has high drainage and should evaporate any of the excess water that the plant doesn’t take in.
If you’d like, you can also opt to make your own potting soil. If you have purchased a tropical aloe plant, adding peat moss to your soil combination can be helpful. Just make sure that the peat never dries out.
If you’ve chosen an aloe species that grows in desert climates, then you’ll simply need a mixture of sand, soil, and small rocks or pebbles.
Potting Your Aloe Vera
If taken care of, your Aloe vera will appreciate some growing room for its stems. That being said, it’s best to start the plant in a medium to large pot. Additionally, the pot should have at least one draining hole in the bottom to ensure that the aloe is not overwatered.
If you’re keeping the plant indoors, add a clear plate to the bottom of the pot to collect any excess water. This way, you won’t have to worry about water leaking onto your tables or floors.
Location for Your Aloe Vera
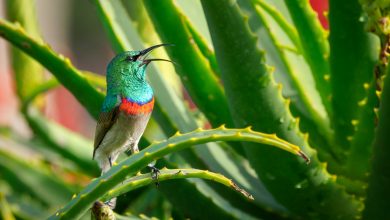
Aloe vera does very well outside, especially when exposed to full sunlight. That being said, it’s a little more difficult to grow this type of plant indoors. If you don’t have much sunlight coming into your home, you might consider a different type of plant that’s partial to shade.
Aloe should be placed in the warmest part of your home, and in a location where it will get good sunlight. Warmth is most important since too much sun can actually burn the leaves.
Watering Your Aloe Vera
When you first purchase your Aloe vera plant, you’ll want to hold off on watering for the first few days. The roots of the plant will need to establish themselves in the soil you’ve chosen before they’re exposed to more watering.
After that, watering an indoor Aloe vera will only need to be done every two to three weeks, maybe less. This will depend on how much sunlight the plant is getting and other conditions. If you notice that the leaves on your plant are starting to become thin or curl, you should water immediately.
During the wintertime, most succulents will become dormant and slow their growth. At this point, it is definitely not as necessary to keep up this watering schedule.
Aloe vera is very forgiving when it comes to watering; less is always more. Even if you go away on vacation, your plant should be just fine. If you’re not sure what your succulent needs, always assume another solution is required before going to watering.

Signs of Stress
Aloe vera loves the sun, but getting too much of it can actually cause it to burn. If you notice that the stems are turning yellow, then your plant is likely looking for some shade to bring temperatures down.
If your Aloe vera has always had fleshy leaves, then you should take note if they ever feel empty or thin. This is a sign that your aloe plant is sucking up its own water supply. To help restore the plant’s health, give it a fresh supply of water, ensuring that there is lots of good drainage for any excess.
Droopy leaves are another bad sign for your aloe plant since it means it’s been over-watered. When it comes to succulents, they don’t need very much water since they have their own storage supply. Overwatering will make the plant become sickly and droopy and may even cause root rot.
If you have any kind of succulent, including an Aloe vera, always waiver on the side of caution with water. Soil should drain well, and there should be a drainage hole in the pot so it can dispose of water it doesn’t need.
Dry or brittle leaves are a sign that your plant may actually need more water. Before you do though, make sure that it is not too much sunlight that is causing the brittleness. If it’s not, stick your finger down into the soil to see if it’s completely dry. If it is, you can go ahead and add water.
Aloe Vera Pests
Like any plant, aloe is susceptible to pests and other problems. Two of the most common pests you’ll find on aloe are called mealybugs and scale insects. These bugs are attracted to the juices in the aloe plant and will happily suck the plant dry of its nutrients and water supply.
To get rid of these pests, an organic insecticide will do. If you’re worried about spraying store-bought insecticides in the house, you might also consider creating your own homemade version.
The best ingredient to spray onto infested aloe is neem oil. This oil has over 50 natural insecticides and is very powerful. Mix a small amount with some warm water and organic liquid soap. Spray on the infected areas as needed.
Fungus can also be an issue for Aloe vera if the soil is not kept dry. This is a common issue when the plant is overwatered; an aloe that sits in the sun and has sitting water is a welcome invitation for fungus. Keep the soil dry and ensure drainage to avoid fungus.
Aloe Vera Propagation
One of the coolest things about taking care of an aloe plant is that, if you do it correctly, you may be able to benefit from its propagation. Healthy aloe plants will multiply quite quickly, and if yours is doing well, you’ll notice small “pups,” or shoots.
When you do see that your aloe is multiplying, you might have to consider re-planting it to give it more space. You can take these pups from your main aloe plant and re-pot them in similar conditions. Once rooted, the pup will grow on its own and provide you with all the aloe you need.
This is especially ideal if you are using your aloe plants for medicinal purposes. Re-plant the pups if you have space so that you always have some extra aloe growing when you harvest.
To propagate properly, wait until the pup has some of its own leaves before doing anything. When you’re ready, remove the entire aloe plant from the pot and gently loosen the soil around the roots. Then, you can safely separate the pups from the main plant.
Leave the pup to dry for about a week; this helps the roots to callous. Place the pup in a small container, along with the proper cactus-style potting soil. When it gets too big, be sure to transplant it to a larger pot.
Harvesting your Aloe Vera
When your Aloe vera plant is large and healthy, you might think about harvesting some of the shoots for medicinal or cosmetic purposes.
The best time to do this is when you can see that the aloe plant already has new shoots growing up the inside of the plant. This ensures that, as you take stems away, others will be there to take their place.
You’ll want to harvest only the leaves from the outside of the plant – these are the most mature leaves and they likely hold the most gel inside of them. Cut these pieces as close to the base as possible, in one sharp motion. Make sure to avoid any roots.
How to Use Your Aloe Vera

Medicinal Uses
Aloe vera produces two important substances: a clear gel and yellow latex. These two substances are believed to have healing benefits that have been used for thousands of years.
These are the two main substances that are used in commercial products we see today. The gel substance is used to create topical medications, which are said to help with a variety of skin ailments, including burns, rashes, psoriasis, acne, and dry skin.
The yellow latex is often combined with other ingredients and is then ingested to help with relief from constipation.
If you’ve broken off one or two pieces of your mature Aloe vera plant, then you’re ready to put it to good use. Lay a long stalk on a cutting board and cut the tip off of both ends. You will see all of the gel sitting within the outer layer.
Trim off the spiny pieces so that they aren’t a nuisance to you. Very carefully, use a sharp knife to slide along the inside of the tough skin, eventually pulling it back to expose the gel inside. Then, lay the gel face-down and cut away the other layer of outer skin.
For Burns
If you’re treating yourself for burns, keep in mind that these should only be mild burns. Serious burns should not be treated with aloe, especially if there are any open wounds.
The most direct way to treat minor burns is to scoop out some of your exposed aloe gel and to apply it directly to the burn area. Allow the aloe to sit and eventually soak into the skin.
For Stretch Marks
Aloe gel is extremely hydrating, which is why it can be beneficial for dry, cracked, or burned skin. In the case of stretch marks, the application of Aloe vera may help to increase the elasticity of the skin.
In this case, aloe can be mixed with some common ingredients to create a homemade aloe cream that will be applied to the stretch mark area. You will need:
- 1 avocado, mashed until smooth
- 1 large stem of aloe gel, extracted
- ½ cup olive oil
Combine these ingredients until you have a creamy consistency. This cream can be applied liberally to the area to improve smoothness and the elasticity of the dermis.
Aloe Face Masks
Our facial skin often takes a hit from all of the touching, rubbing, and makeup it endures. Aloe vera is a great ingredient for face masks since it helps to hydrate and replenish the skin that has been abused over time.
There are quite a few face masks you can create with your homegrown aloe.
One is a lemon and aloe face mask. This mask requires the aloe gel from a full stem, as well as the squeezed juice of half a lemon. Mix the two together, and apply them to the skin in a circular motion. Leave this on for about twenty minutes then remove with warm water.
If your goal is to exfoliate your skin and remove impurities, you’ll want a face cream with a little more texture to it. In this case, you’ll need half a cup of blended, seedless cucumber, the extracted gel of one aloe stem, and two tablespoons of honey. Mix these ingredients together and leave it on your skin for half an hour. Remove with warm water and a cloth, and you’ll notice how much softer and refreshed your skin looks and feels.
Taking Care of Aloe
Unlike a lot of other household plants, Aloe vera isn’t just a pretty plant that you can enjoy as a piece of décor. Not only is it fairly easy to separate and regrow additional aloe plants on your own, but you can also take advantage of the medicinal benefits that aloe provides as well.
As long as you are following the basic preferences of the aloe plant, including good drainage, a warm climate, and lots of sun, your aloe is sure to provide you will all of the benefits you were hoping for.
Of course, if you want to see your aloe really come into its own, place one of your potted aloes in an outdoor space that gets lots of sun. Aloe does its very best in the outdoors, and you may be surprised how large it can get over the course of a summer. When temperatures cool, bring your aloe back indoors for the winter. It’s the plant that keeps on giving all year.