How To Prevent Blossom End Rot
One of the most annoying things about growing vegetables in your garden is coming back to find water-soaked spots on your crop. In most cases, this is a tell-tale sign of the fact that your precious veggies have started to go south.
While blossom end rot, otherwise known as BER, is definitely a common and annoying problem in many gardens – this disorder is totally preventable and relatively easy to treat. However, to beat it, you’ll need to take the right steps just in time.
So before you despair at the loss of your entire harvest for this season, let’s take a look at what actually causes this disorder. We’ll also cover what you can do to prevent it from happening and how you can even potentially treat an affected garden to save the rest of your harvest.

What You Need To Know About Blossom End Rot
Despite the popular misconception, blossom end rot is not actually a disease plaguing your veggies. Blossom end rot is a disorder that is typically seen in plants suffering from a calcium imbalance. While you’ll generally see it affecting tomatoes, this disorder can actually affect a large variety of other vegetables. Some of its potential victims include squash, melon fruits, cucumbers, eggplants, and even peppers.
Unfortunately, there’s really no exact science that applies to all plants under the sun when it comes to what you need to do to prevent it from happening in the first place. This is because there’s a fairly large number of different factors that could cause a calcium imbalance in your growing plants.
Here are just a few of the factors that can contribute to a potential calcium deficiency:
Too Much (Or Too Little) Moisture In Soil
This issue happens most commonly when the growing season starts out with a lot of rain that transitions into a dry spell as the fruits start setting. However, it’s got less to do with weather conditions and far more to do with keeping an eye on the moisture levels of your soil. You’ll have to keep up with your weather forecast to make sure that your plants won’t be flooded with sudden rain showers right after you water them, and won’t go thirsty if you’re out and about and can’t water them beforehand.
Damaged Roots
Your plants rely on their roots to get the nutrients they need to stay alive and grow. When the roots are damaged, this prevents the uptake of nutrients and often leads to underdeveloped plants, if they don’t die off altogether.
Soil Is Too Cold
In a similar manner to damaged roots, soil that is too cold can interfere with your plant getting the nutrients that it relies on.
Too High Of A Nitrogen Content
Adding too much nitrogen into the mix can actually result in a high salt content that will make it much harder for your plants to get the calcium they need from the soil of your garden.
High Soil pH (Or Low)
Soil pH is one of the most delicate elements of the balancing scale that will determine whether your plants will thrive or die out. If your soil is on either extreme of the range, you’ll be faced with a decimated harvest, to say the least.
How Can You Identify Blossom End Rot?
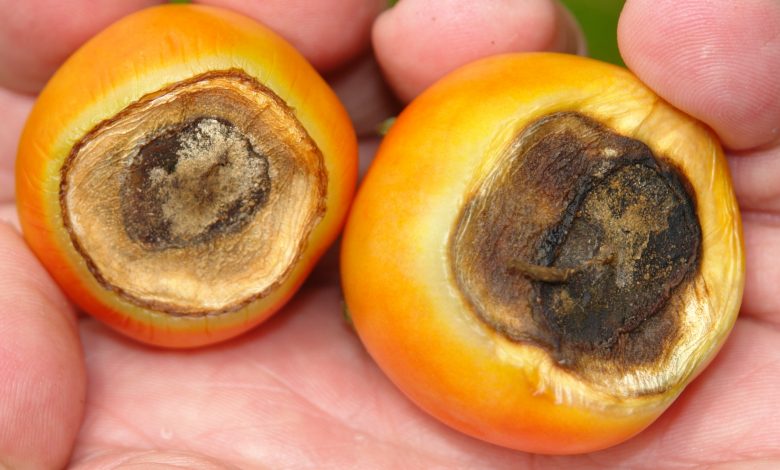
Generally, you’ll see the rot happening in fruit that’s either green or is just starting to ripen. The very first tell-tale sign is a small water-soaked area near the blossom end of the fruit, which then quickly begins to grow, darken and brown.
Does BER Spread To Other Plants?
The short answer is – no. It doesn’t spread between plants in the same way that a disease would. However, keep in mind that plants growing near each other might all be affected by BER because they’re all growing in practically the same conditions.

What to Do When You Find Blossom End Rot
Once your crop is affected by BER, there’s nothing you can do to save the affected fruits, as they’re already rotting and will continue to do so. You should immediately pick the fruit.
If the fruit was just setting, there’s a good chance that the plant may blossom again to produce new fruit. Ripe fruits, however, can either be salvaged, or composted if they’re entirely rotten.
After you’re done picking off the affected fruit, it’s a good idea to apply some calcium-rich liquid fertilizer to the plot to prevent other plants from falling victim and encourage healthy growth. While some gardeners opt for crushed eggshells, it’s not a good short-term approach, as it can take several weeks for them to start decomposing. Instead of this, one possible strategy to give your crops a power-shot of calcium is to water them with powdered milk instead.
Additionally, some people may opt to use lime. However, keep in mind that lime will raise your soil’s pH, and as such, it should only really come into play if you know that you have a pH problem on your hands.
Now that you’ve raised the calcium content and potentially resolved any ongoing pH problems with your soil, it’s time to water. Depending on the climate you’re facing, you should try to water your crop once per day (possibly even twice, if it’s very hot out). Albeit, if the rain comes, you should take care not to over-water your plants – let mother nature save you some work.
Are Affected Veggies Safe To Eat?
Generally speaking, as long as you’re not planning to eat the rotten end itself, there’s virtually no harm in eating an affected vegetable. Just cut off the damaged parts, and it should be good as new.
However, it should be noted that the rot can go quite a bit deeper than it might seem at first glance. So once you’ve cut off the spoiled end – make sure that the rotten taste hasn’t spread into the rest of vegetable.
Our Tips To Counter Blossom End Rot

Maintain Proper Moisture Levels
While the ideal moisture levels will vary from plant to plant, the general guideline is to make sure your plants are well-watered, without excessive moisture. You can do the good old “finger test,” where you stick your finger into the ground near the plant (be careful not to damage the roots) to ensure that the soil is moist at least a few inches down.
If you live in an area that receives a lot of rain towards the start of the growing season, you can try to trench your plot so that any excess rainwater flows and collects away from your harvest.
And if you’re struggling with maintaining a consistent level of moisture, you can try to use mulch and compost to encourage new root growth. Mulch will retain moisture and keep it from evaporating, while giving your plants a bit of a reserve. However, exercise a bit of restraint with this, as the last thing you’d want is to drown your plant (which will also inevitably lead to BER).
Plants that are growing in pots are also far more susceptible to BER than their plot-grown counterparts. This is due to the fact that it is a lot harder to keep the soil moist enough in pots without going overboard. If you’re struggling with preventing BER in your pot-grown veggies, you can try watering spikes or even smart watering systems that sense soil moisture levels and control the water output for you.
Keep Your Soil Nice And Warm
Earlier on, we covered the fact that having your soil too cold will limit your plants’ nutrient uptake. In turn, this can easily lead to your plants being affected by BER. The rule of thumb when it comes to planting the common victims of this disorder (like tomatoes) is to wait until nighttime temperatures rise higher than 55 degrees Fahrenheit.
Ideally, your seedlings should be planted in soil that sits roughly at a nice and cozy 60 degrees Fahrenheit throughout the day. This will help them germinate and ensure a good pace of growth, while also allowing for good nutrient uptake to keep your plant nice and healthy.
If you live in a colder area that struggles to reach ideal planting temperatures, you can cover your plot with some darker plastic to help raise the temperature of the soil underneath. Another potential option would be to use garden fleece or row covers, depending on the arrangement of your plot. In a nutshell, garden fleece is actually comparable to a floating mulch. When used in your garden, it can help you create a warmer micro-environment for the plants and seedlings you cover with it. And it can also save your crop from insects and weeds.
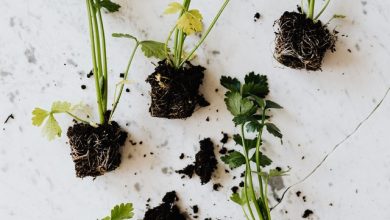
Avoid Root Damage & Mulch Your Garden
Dealing with some damaged roots is, unfortunately, practically unavoidable most of the time, especially when the weeds start to grow in and you get to work on attacking the pests before they spread.
The general guideline is not to weed excessively, and if you absolutely have to cultivate your plot, do so a little further away from your growing harvest.
One of the easiest ways to limit the need to cultivate and weed your crops is by making good use of mulching. In fact, mulching can bolster the health of your crop and provide for optimal growing conditions even in areas where they don’t naturally occur. You can use a synthetic material, but for most plot-grown veggies, we recommend that you opt for organic mulch instead.
Here are just a couple of benefits you can enjoy if you choose to mulch your plot:
- Better soil drainage and reduced erosion
- Protection from excessively hot and cold temperatures
- More consistent soil moisture levels
- Fewer weeds and less needed cultivation
- Improved soil health and nutrient balance
Knowing and understanding the benefits of mulching is pretty essential, but knowing how to actually mulch is an absolutely crucial skill that any gardener should have.
While mulching can be a pretty complex process depending on the approach you choose, let’s have a look at the fundamental guidelines and what the process boils down to in most cases.
Here are the 4 basic steps to mulching:
- Clean up your garden plot, picking up any debris and dry leaves while plucking out any weeds.
- Even out the soil in your garden to avoid drainage problems or gaps in mulch where weeds can grow.
- Thoroughly soak your garden bed to lock in moisture while your newly applied mulch settles.
- Spread the mulch around your garden, aiming at a thickness of three to four inches across the entire area.

Check The pH Level Before You Plant
Now that you’ve cleaned up your plot, you’ve got your mulch ready, and you’ve even planned out just how you’ll ensure consistent moisture levels, it’s time to plant, right? Not quite!
Any experienced gardener knows that, before you go to plant anything, you should check the soil conditions. And the very first thing you should be checking is the pH of your soil. Having the right pH is essential for your plants, especially during the initial stages of their growth.
The easiest way to get started is to use a soil testing kit or a test meter to check on the balance of nutrients and measure the pH levels all at once. You can easily pick either one up at a local garden store or order them directly from online retailers. However, if you want to test your soil at home without having to go and pick up one of these kits – we’ve got the perfect solution for you!
The first thing you’ll want to do is collect a cup full of soil from your garden. Get another cup, and add half of the collected soil to it. Take the first cup and add half a cup of vinegar. If you see that it fizzes, then your soil is likely alkaline and would fall between 7 and 8 on the scale. However, if there’s no reaction, move on to the second cup. Here, you’ll want to add some distilled water and drop in half a cup of baking soda into the mix. Keep your eyes peeled for a reaction (it should fizz if it reacts). And if you do see a reaction, it’ll tell you that your soil is acidic and likely falls somewhere between 5 and 6 on the pH scale.
If your tests produce no reaction to vinegar or baking soda – it means you are a very lucky individual because you have neutral soil, which is a pH of 7 on the scale.
Ideally, you want to aim at a more acidic pH of roughly around 6.5. Though, you’ll be able to get away with a pH of 6.0 to 6.8 just fine as well. This is also the pH range that most vegetables prefer for proper growth. And while you’re at it, remember not to let it drop below 4.5, as you will suddenly face a fungal onslaught that could decimate your crop in a heartbeat.
If you find that your pH is a little low, you can give it a nice bump by adding some calcium, which also helps with preventing BER. To add some calcium to your soil, you can work in some crushed eggshells as you plant. However, gypsum or crushed garden lime work just as well.
Use A Good Organic Fertilizer
Using a well-balanced fertilizer is one of the essential steps to not only preventing blossom end rot, but also making sure that your plants grow well. Whether you’re planning to use organic fertilizers like some aged manure or compost or store bought, a good fertilizer will give your plants a jump start on healthy growth.
If you’re growing veggies that are susceptible to BER, you should avoid nitrogen-rich fertilizers, while making sure that you don’t go overboard with the fertilizer either, as this could also potentially cause the disorder. It’s especially important not to over-fertilize when the fruits start to set, as this is when the proper nutrient balance plays a key role in the development of your crop.
Now, you shouldn’t deprive your plants of nitrogen either, as it’s still a quintessential element for plant growth. What you should do is opt for nitrate-nitrogen fertilizers while avoiding ammoniacal nitrogen variants. This is because the latter of the two will only make things worse as it promoted blossom end rot.
Vegetables like tomatoes absolutely love fresh fertilizer. Here are a few organic fertilizers that you can use to help prevent blossom end rot:
- Aged manure from vegetarian animals
- Plant compost
- Fish emulsion
- Kelp meal
- Organic cottonseed meal
- Seaweed
- Alfalfa meal
While it might be tempting just to go and pick up a chemical fertilizer at the gardening store and call it a day, organic fertilizers actually have quite a number of significant advantages over their chemical counterparts. Unlike chemical fertilizers, they increase the quantity of organic matter in your soil, while improving structure, tilth, and even the soil’s capacity to store water. Organic fertilizers provide a slow and consistent release of natural nutrients rather than a fast release of synthetic compounds. Over the long term, going organic will add up to fertile soil and healthy crops for many years on end.
Do Epsom Salts Prevent Blossom End Rot?
This is actually a relatively popular myth. Unfortunately for believers, Epsom salts not only fail to stop BER, but they actually make the whole situation worse.
Let’s revisit the fact that blossom end rot is caused by a calcium deficiency. Just like in the case of a nitrogen overload – the magnesium ions found in salts will compete with the calcium ions that your plant needs to survive when it comes to uptake. So the more magnesium content there is in the soil, the less calcium your plants will be able to absorb. And the less calcium, the more at risk your crop will be when it comes to blossom end rot.

Excessively dry or moist soil, an overload of nitrogen fertilizer, and damaged roots are all a one-way ticket to blossom end rot for your precious plants. And while it doesn’t spread like a disease, blossom end rot can make short work of decimating your entire harvest.
But if you’re ready to put in a little bit of work, the tips we’ve covered can potentially save you lots of stress and despair, while protecting your precious vegetables from BER.